About Arrow Maze Solve
Tap arrow groups to re-route them across one connected track, while a clock, a battery and three hearts all run down at the same time.
A one-screen arrow-routing puzzle that teaches itself with three words — "Tap to Move!" — and runs a clock, a battery and three hearts at the same time.
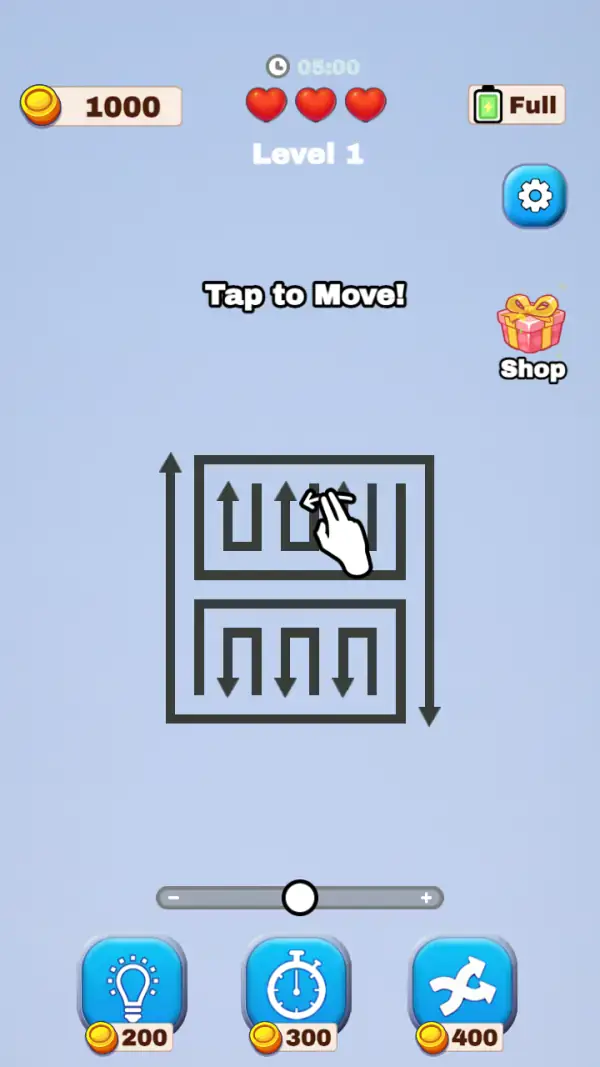
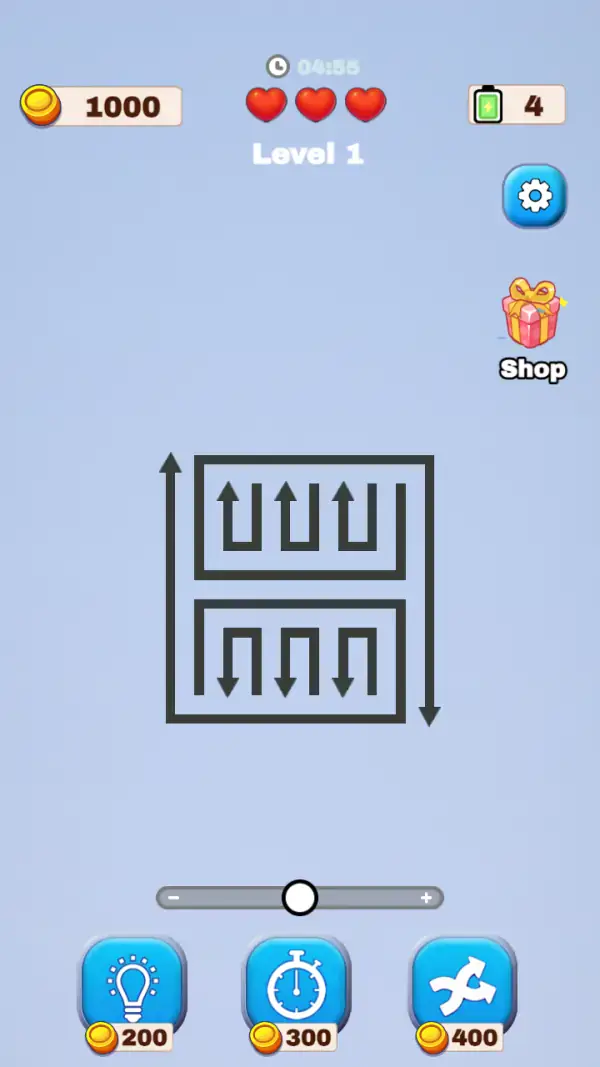
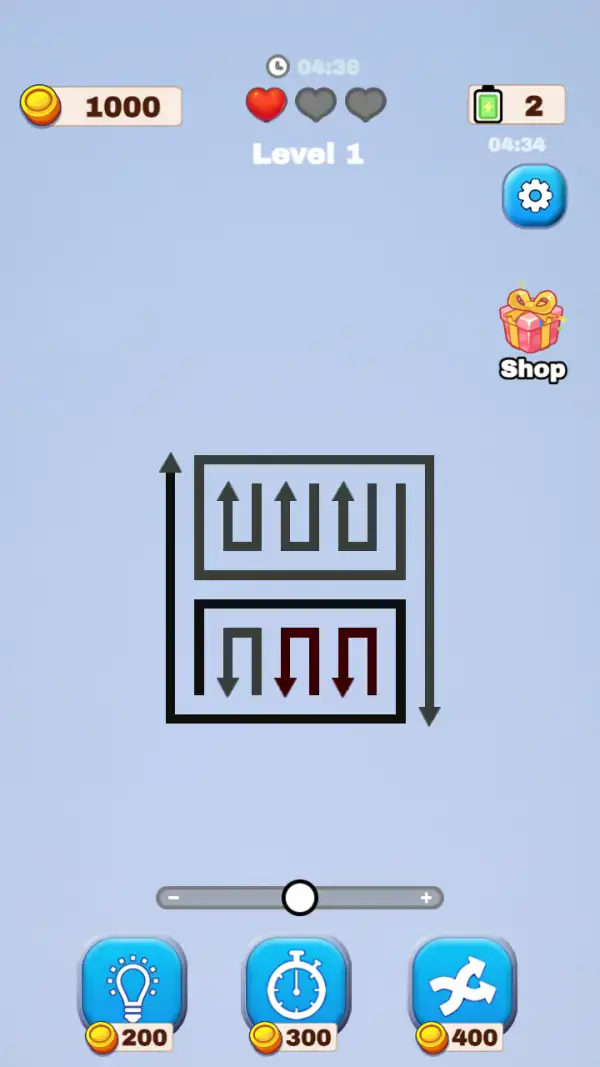
Level 1 is a single drawing in the middle of a pale blue screen: a rectangular track containing two rows of hooked arrows — three pointing up in the top row, three pointing down in the bottom one — wrapped by an outer loop whose left side rises and whose right side falls (frames 1–3). It reads like a wiring diagram rather than a board game, and there is nothing else in the play area: no grid, no pieces, no timer bar across the puzzle itself.
The game's whole tutorial is two words. On the untouched board a hand points into the top row of arrows and a caption above it reads "Tap to Move!" (frame 1). That is the verb, stated outright, and it is gone by the next frame we captured (frame 2) — the level is one object you shift, not a maze you walk.
The header holds four separate readouts, which is more than any other puzzle here carries. Top-left is a coin balance of 1000, unchanged across all three frames. Centre-top are three hearts under a clock that reads 05:00, then 04:55, then 04:36. Top-right is a green battery pill that prints the word "Full" on the fresh board and a number once it has started draining — 4 in frame 2 and 2 in frame 3, with a second small clock reading 04:34 under it (frame 3). Below the puzzle sits a horizontal slider with a minus at one end, a plus at the other and a knob in the middle: a zoom control for the board.
Along the bottom are three blue tools, each with a coin price printed on it: a lightbulb at 200, a stopwatch at 300 and a pair of crossed arrows at 400 (frames 1–3). Settings and a "Shop" gift box are stacked down the right edge. Between them, the game is entirely self-service: you can buy your way out of a stuck board, and the prices are on the buttons.
Gameplay screenshots
Captured from the build running on this page, not promotional art. Every claim in the guide above names the frame it comes from.
How to Play
- Read "Tap to Move!" as the rule, not as decoration: an arrow segment is shifted by tapping it, and that is the only action the game teaches (frame 1).
- Before doing anything, drag the zoom slider toward the plus and read the whole track. The puzzle is one connected drawing, and the outer loop is part of it (frames 1–3).
- Follow the flow from the arrowheads. On Level 1 the top row points up into the outer loop and the bottom row points down out of it, so the two halves are not independent.
- Work one row at a time rather than the whole rectangle — a change in the top row is visible against the outer track immediately.
- Keep the clock in view, and treat the battery pill as a second timer: it read "Full" untouched and 2 by the last frame, so something on this board drains it (frames 1–3).
- Buy the 200 lightbulb before you lose another heart. On the frame where two hearts had already gone grey, a group of three arrows in the lower row was boxed in black and redrawn dark red — the game flagging a segment you have to deal with (frame 3).
Three failure counters running at once
A clock, a battery and three hearts all sit in the header, and our three frames show all three moving: 05:00 → 04:55 → 04:36 on the clock, "Full" → 4 → 2 on the battery, and three red hearts reduced to one red and two grey by the last frame (frames 1–3). Whatever the hearts are for, they are demonstrably spendable on this board.
Three hints with prices on them
Lightbulb 200, stopwatch 300, crossed arrows 400, printed on the buttons (frames 1–3). Against a starting balance of 1000 that is five hints before you are broke, so the coin balance is a real resource here, not decoration. It did not move across any of our frames.
A zoom slider for the board
The slider under the puzzle, marked with minus and plus (frames 1–3), is unusual and it is the answer to this game's main difficulty: arrow tracks are hard to read at the size they fit on a phone. The knob sat in the same place on all three frames, so we never moved it — but it is the only free control on the screen.
Tips & strategies
- The hearts are the resource that does not come back between attempts. Two of the three were grey in our last frame while the coins still read 1000 (frame 3) — the board spends lives, not money.
- Zoom is free. Players stuck on an arrow maze are usually misreading a junction, not out of ideas.
- The three tools are priced differently for a reason: the lightbulb is the cheapest way to keep a run alive and the 400 crossed arrows the most expensive.
- The "Shop" on the right edge is the only place the 1000 balance can go, and nothing on the captured frames shows a second currency to spend it on.
- A dark-red segment inside a black box is the game marking a group as relevant rather than as solved — check what a boxed group is pointing into before you tap it (frame 3).
Where players go wrong
- Playing at the default zoom. The whole puzzle is thin lines on a pale background, and the slider is sitting right under it.
- Assuming the clock is the only fail state. Two of the three hearts were already greyed while the clock still read 04:36 (frame 3).
- Spending the 1000 starting coins on 400 shuffles when a 200 lightbulb is the cheaper read on the same board.
Playing on phone, tablet and desktop
Portrait. Our first capture pass rendered this build sideways because the catalogue had it filed as landscape; drawn at the size it actually uses, the puzzle sits in the middle third with the zoom slider and three tool buttons all below the thumb line (frames 1–3). Keyboard arrows are not used on any captured frame — the input is taps and drags.
Frequently Asked Questions
Is Arrow Maze Solve landscape or portrait?
Portrait. The build draws a vertical board with the tools along the bottom (frames 1–3). It was listed as landscape in our own metadata, which this rewrite corrected.
Is there a time limit?
Yes — a clock in the header ran 05:00, 04:55 and 04:36 across our three frames, and the 300-coin stopwatch tool is priced as a time purchase.
What do the three hearts mean?
They are a life-style counter, and they are spendable: on the last frame we captured only one of the three is still red and two are grey (frame 3). What specifically costs one is not shown in the stills.
What is the green battery icon?
A second counter in the top-right. It prints "Full" on the untouched board and then a number — 4, then 2 — as the frames go on, with a small 04:34 clock appearing under it in the last frame (frames 1–3). We could not tie it to an action from stills, so treat it as a resource rather than as lives, which are the hearts.
What does the slider under the board do?
It is marked with a minus at the left end and a plus at the right, under the puzzle (frames 1–3) — a zoom control. It is the only free control on the screen.
How much do the hints cost?
200 coins for the lightbulb, 300 for the stopwatch and 400 for the crossed arrows, printed on the buttons themselves, against a balance of 1000 that never moved across our frames.